¶ Scenario
So as an web developer you've built your website, and created a form for the capture / submission of some data. Thats usually the easy bit done.
The difficult point comes then, in how to have an end-point for the webpage to send the data to, and how to write the code behind this to perform the required actions.
This then is an easy case to show how Rulevolution can make a large difference to flexibility and productivity.
¶ Key Points
- Rulevolution can accept any data structure and data
- Data can easily be handled / processed by the creation of a model (i.e. via configuration)
- The model can then be tested and ultimately easily be moved to a production environment
- Development can continue in an iterative manner
¶ Pre-requisites
- You have an existing Rulevolution account
- You have a webpage form for the collection of data (or follow the webpage tutorial)
¶ Tutorial
¶ 1. (optional) Create a new project (or use an existing one)
To create a new project - from the Select Model screen, create a new project by picking New, select the category Project : New Project..., and specify a new Name…
¶ 2. Create a new Model
From the Select Model screen, create a new model by New, select the previous Project, and specify a new model Name
The new model will appear in the Projects list (the default view) on the right hand side of the screen under the desired Project
Open new model by double clicking the model in the list
This will present you with an empty process screen on the the right, with a list of component categories on the left
¶ 3. Create a initial basic model
By expanding categories and dragging components from left hand side, place them on the process canvas (then main part of the screen)
Left clicking on a component on the process canvas, and selecting Connect to, then clicking on the destination component, components are connected in a flow, it is convention to create a flow from left to right, but this is optional.
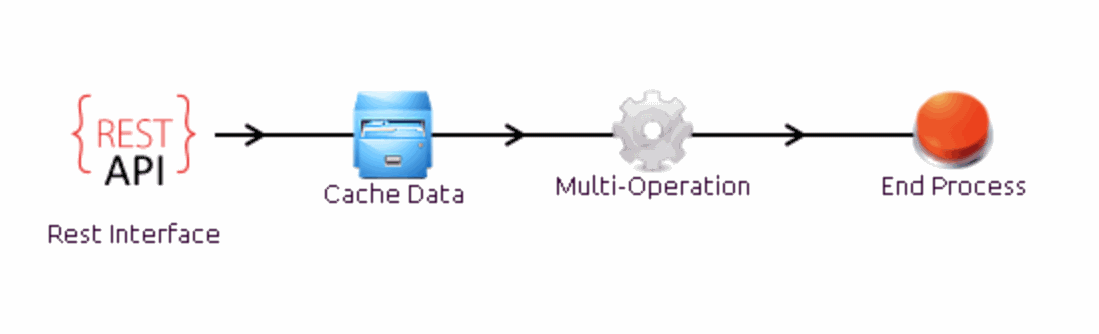
By the above mechanism create the following flow, using (in order)
- Input-Output - Rest Interface
- Build Tools - Cache Data (makes building models easier)
- Processing - Multi-Operation
- Input-Output - End Process Rest Simple Process Flow
This should create the following:
¶ 4. Now edit the Rest Interface Node
Right Click on the Rest Interface Node, and select Edit
On the left hand side of the screen you will see the properties (Prop) of the node, to edit a node property, just select the property, and a dialog will appear. The choice of what can then be done (selection of a value of input text), depends on the name of the data which that property will accept.
- The name may be edited as you chose fit, in this example we've left it as "Rest Interface"
- Domain may be left blank (for more details, look at Rest Interface Node help)
- Path - edit this to specify the path to your end-point, for this example set to /formSubmission (Note if not specified, the model will not be able to be deployed)
- Auth Type - may be left at the default for now
Once the model has been created, it may now be deployed for testing
¶ 5. Deploy Model
Select Action (top right), and Deploy Model
Following confirmation, success should result in a Model Deployed message.
if not, then please check the Common Errors page
¶ 6. Obtain your users API key
This may be selected from the users details page
- Select Action, User Profile, and copy of the contents of the api-key field
Note: the contents of this field may be longer than is displayed within the dialog
This field may not be edited, if for any reason you need this key changing, then please raise a support request.
For this example, our key is:
C7******-**************-********E6C4 (for security some digits have be obscured)
¶ 7. Call the API (v.1.0)
The API is deployed, and you now have a valid authentication key.
- The api-key needs to be submitted in a field of that name
if a redirect field is supplied, then on success return this will be invoked
An invocation can be made using a web-page or a common testing tool like Postman
¶ 8. Test connectivity
Once deployed, and has been called, you can open the Cache Data node, and see the items submitted in the inputs tab on the left hand side of the screen
Note: Time stated in the inputs panel is server time
¶ 9. Add additional behaviour
Additional behaviour can now be added to the model, like writing to a database table or similar.
¶ 10. (Optional) Move to an independent production environment
- with the model open, select Action, then Export Model this will export the definition of the model as a file
- logon to your production system
- from the Select Model screen, select Import, select the file exported from the step above, and pick the project you wish to import into
- click Finish and the model will be imported
- the list of projects/processes will refresh, and your model will be in the correct place
- As this is a different system, you will need to deploy this model
- open the newly imported model, but double clicking it in the list
- open opened, select Action, and then Deploy Model to make this model live